
Monday, December 27, 2010
Hi Voyagers!
I'm delighted to learn some of you are following! I'm in Lexington right now, visiting MP, BS_N and the lads. Hope to see some of you while I'm here 'till Tuesday (the 4th)
Friday, December 24, 2010
The Tall and the Short of it.


Thursday, December 2, 2010
More on the Tall Chair

I am job hunting now, too. Going to Lexington, MA for New Year's.
Remember when I used to write a lot?
Busy....


Sunday, November 21, 2010
A re-do due to doo-doo
The foot rest was a ring of wood held between the four legs' ankles, wider at the front for your feet to rest upon. The whole time I was working on it, mitering four pieces of wood together into a frame from which the foot rest would be cut, building a beautiful jig to precisely guide a router as it made the eccentric circular cutouts, and then making the cuts themselves, the whole time, I kept wondering if it would look like a toilet seat, if that would come to anyone's mind beside mine.
It occurred to Jeff Tiedeken in about 3 seconds, he managing only to slightly soften the blow by saying "I hate to say this, but it looks a little like a toilet." I do love honest friends. He scores consistently high on this measure.
I have moved on. Back, actually, to a previous design, in which the brass cross bars of the original chair are present, and an additional 5/8" brass rod encircles the front half of the chair, held aloft from the front three legs by nicely made brass stanchions. This alteration will be easy to accomplish as I have already received all of the necessary components from internet sources, having ordered them and other components for even other alternatives, all while I was sketching variations on the foot rest and trying to finalize my choice. I tried the toilet. Looked ridiculous. Now I'm making the cantilevered foot rail. I've modified the wood as required. Monday, I will get some 5/8" solid brass rod, having slightly crushed the 5/8" brass tube I had as it went through the tubing bender, enough so that it no longer passes through the stanchions. 3 days lost. Oh well.
Today I saw two rooms available for rent in two share houses. Not happy with either.
Wednesday, November 17, 2010
Progress on the Tall Chair


Saturday, November 13, 2010
Pressing on
After a few days rest, I worked out a few improved jigs and so forth, and started the tall chair. In two days I have completed what took me a few weeks the first time! I see some additional streamlining I can do to get this much down to 1 day next time. Interesting. To-do list: rent room in share house (saw one from Craig's list, e-mailed another), look for part time work (met a "famous" stair builder, showed my pics and got some leads to high end contractors, met a great woodworker and showed my pics, etc.), do some back taxes, get a check up (I've let some maintenance slide a bit).... and MARKETING.
Monday, November 1, 2010
Improved photo

A very good friend from New York visited me yesterday. It was a terrific visit, but I was surprised by my sentimentality, contrasting my life back then and now. He pointed out that what I'm doing is new to me, and that if I am truly pursuing art, I should expect the work to evolve, slowly over time. Great advise. I have to get out of the emergency and panicked way I am trying to proceed.
Friday, October 22, 2010
Fabrication coming up...
Dan is drawing the computer model. I meet with Mike Wednesday at 10 to see if his firm can make my parts.
Everyone has sent me such encouraging e-mails, it's really wonderful. Special thanks to folks here in the shop for advice and help, with very special thanks and well wishes to Andrew Isley, who is recovering from heart surgery. Also huge thanks to John and Mary Kathrine for their unbelievably generous hospitality and support.
Everyone has sent me such encouraging e-mails, it's really wonderful. Special thanks to folks here in the shop for advice and help, with very special thanks and well wishes to Andrew Isley, who is recovering from heart surgery. Also huge thanks to John and Mary Kathrine for their unbelievably generous hospitality and support.
Wednesday, October 20, 2010
First pic..

I called the furniture fabricator today, and the CNC computer modeler. I also drew up a few ideas for variations. So much to do!
Tuesday, October 19, 2010

Friday, October 15, 2010
Making Glides
Tomorrow, when the shop is relatively empty, I will take the chair into the relatively dust free bathroom and apply the final finish coat of polyurethane.
Sunday, I will sit down. :-)
Thursday, October 14, 2010
Tuesday, October 12, 2010
No such thing as "The Bottom"

I installed dowels to mount the back rest and arm rests, then sanded all the Zebra wood parts with successively fine sandpaper up 400 grit. I made some stands for the parts and applied a first coat of polyurethane. Tomorrow, I will install the Zebra wood parts, do a final sanding on everything and be ready for a final coat of satin polyurethane. Click here for the pics :-)
Monday, October 11, 2010
Attaching the Back Rest

Testing the Back Joint and Geometry

Today, I made the connection for the back rest cross bar and test assembled the seat and backrest for a trial sit. It felt very good, but I decided to trim the mating surface of the back support bottom joint, to raise the angle to be slightly more upright, about half an inch forward, which required just an eighth of an inch trim at the joint. This is done now, including tweaking the pre-tensioning lag bolt at this support's weak spot. Nothing left but to install the Zebra wood parts and apply final finish.
Click here for the Flickr pics.
Saturday, October 9, 2010
Hi Hart Howerton
Hi BR, JM, RR, CP, and anyone else looking in from time to time :-)
Hope all is well. I do miss NYC and HH from time to time. But California is great, so eat your Harts out, lol.
Cheers
Hope all is well. I do miss NYC and HH from time to time. But California is great, so eat your Harts out, lol.
Cheers

Thursday, October 7, 2010

Ready to go,... wait, ONE MORE TEST!

I went to sleep knowing that I can not make this any better.
But I woke at about 6, with a start; will the arms and back really work??? These are single pieces of wood sticking up, doing the work normally done by at least two vertical pieces on every chair I have ever seen. I have a good sense of the strength of materials, but the little nub I was able to snap off so easily the other day, made me very nervous about the brittleness of this wood. As I dressed (in my truck outside the shop, where I have been staying most nights, with visits to my friends John and MK every few days) I already started contemplating a test of the arm and how I might redesign it if it proved inadequate. I imagined a connection tieing the arm to the back support... but ugh, I don't want to have to do this.

Only a man who cares has doubt. (proverb)
Will my mortise and tenon joints attaching the arms and back be sufficient? Am I using the best glue, the yellow woodworking glue? Should I use Epoxy, which is better able to fill voids as I have around my not so perfect m&t joinery? Or the new polyurethane glues, like Gorilla Glue, which can expand to fill voids? Each of these have problems, too; the epoxy is runny and messy and very hard to clean off if it gets on an exposed surface, and the polyurethane glues lose strength where they have room to expand, and the squeeze out from the expansion can make a mess too. I looked over my joints again. They're not so bad. One could use a touch up. I think I'll do that and stay the course with the old reliable yellow glue.
On to pre-finishing and prep for glue up.
Tuesday, October 5, 2010
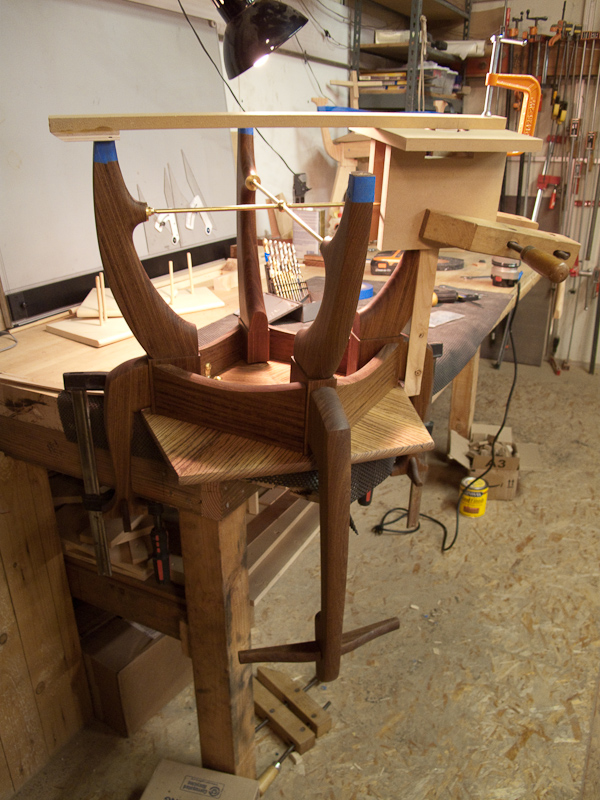
Installing the Cross Ties and a Partial Assembly

There are also several photos of the bottom half of the chair assembled to test fit the cross ties. (You may notice little pieces of wood in the middles of the arches that resemble keystones. They are simply there to protect what will be smooth arches from being marred by the clamps.) This is the first time I have seen this much together, and is the first confirmation that all of my geometry works and that all of my joinery and metal connections are correct. Whew! I think about 400 hours have gone into this project (including all the figuring out of things, building jigs, testing, creating mock-ups, remaking parts, and a lot of research and self teaching of general woodworking techniques.) Still, I am relieved that it all worked and I am now, for the first time, confident to proceed to glue up the chair!
By the way, I think it looks amazing.
Monday, October 4, 2010


Sunday, October 3, 2010
Making the Brass Cross Ties...

Friday, October 1, 2010
I love Berkely..
I asked a shopmate metalworker, Steven, how I could blacken and tarnish my brass parts. He said "Why don't you throw them in this bucket? They'll blacken in a few hours." I'd found on the internet 4 oz bottles for $9 ea. from hobby suppliers, and Steven had a whole Rubbermaid vat of the brew.
Wednesday, September 29, 2010
The Last Pieces!

Click here for a Flickr show of the last couple of days, and today's grand finale: the arm and back rests.
All that's left now is final sanding, pre-finishing, glue-up, final finishing, and the metal tie rods between the legs.
Then, I turn to sales, while I get CNC fabrication going.
Sunday, September 26, 2010
Jigs and splines

Saturday, September 25, 2010
Another test seat...

Friday, September 24, 2010
Adding a pretensioning member (lag bolt), and making the seat

Also, after a failed attempt to build the seat with angles measured from the mock up and used to cut 8 triangles on the table saw, I got a terrific suggestion from shopmate Andrew Isley; build a jig that holds the seat component off the saw table at the correct finished orientation, and let the saw cut straight and the geometry can take care of itself! I built such a jig and it worked perfectly on some test wood. I also tested rounding the edges of the pieces on the router table, and discovered that the unsupported ends had noticeable "tear out" when the router bit emerged from the piece. I'll solve this too, and also try splining together some of the panels, before I make the final seat out of the very expensive Zebra wood I milled from 2" lumber yesterday.
Meanwhile, in the shop's finishing room, I have prepared several finish samples on scraps of Afromosia, combinations of sealers, pore fillers, stain, and polyurethane or Tung oil; I need to get a beautiful finish I am certain I can produce on the 20 parts of this first chair, and be sure it dries correctly and so forth. I am pretty sure I have a good recipe, but before I proceed, I will check in with Sandy's brother, a professional antiques restorer.
I've ordered a variety of little brass components from which I can make the tie rods across the bottom of the chair legs. If these are problematic, I can do something with bicycle spokes and some of their fastening components. We'll see.
Subscribe to:
Posts (Atom)


